

377Uploads
149k+Views
9k+Downloads
Art and design
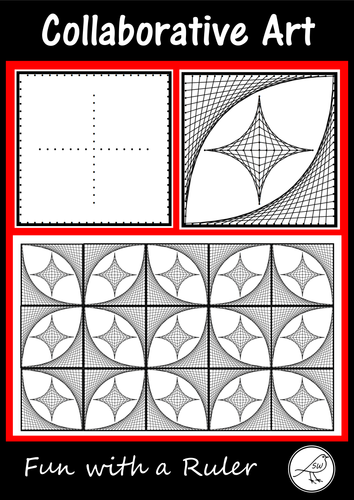
Fun with a Ruler - Collaborative Art Project using Parabolic Curves
A ‘Fun with a Ruler’ art project that involves drawing parabolic curves (curves that are made by drawing a series of straight lines).
This project involves your students ruling straight lines between 2 dots on a template. When they have finished drawing all of the lines they can give their artwork some colour.
Each student completes a square. Join the squares together to make an eye-catching display (see image for example).
Included:
♦ Template – black dots
♦ Template – light grey dots
♦ Example
♦ Display suggestion
♦ Instructions
♦ Teacher notes
Level of Difficulty:
Your students need to be able to use a ruler to draw straight lines between 2 points (the curves are made with straight lines … it’s like magic!). The designs can look more complicated than they actually are. Concentration is required, but the actual process is not difficult.
Instructions:
Simple, clear, easy-to-follow instructions are provided. One instruction per page (image and a sentence). Display the instructions via a data projector if you have access to one. Otherwise print and enlarge them and/or demonstrate on an enlarged template.
Equipment:
You need a ruler and a pen (black works best). Something to colour with (eg coloured pencils, watercolours, felt tip markers, chalk pastels, dye, etc)
Size:
Each square measures approximately 18.5cm x 18.5cm. Designed on A4 size paper.
Keywords: string art, math, geometry, patterns, parabolic curves.
© Suzanne Welch Teaching Resources
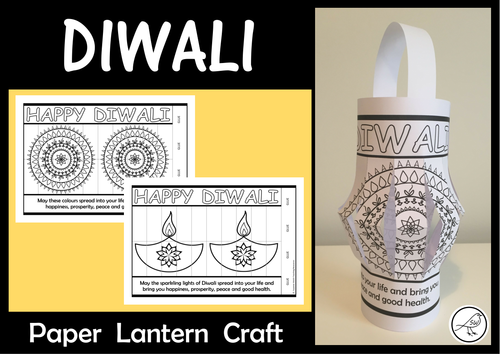
Diwali - Paper lantern craft
Celebrate Diwali (The Festival of Lights) by making these paper lanterns. Fun, easy to make and they look great hanging in the classroom.
Included:
♦ 10 x different templates
♦ Handle template (just cut paper strips if you want to cut down on printing)
♦ Construction instructions
♦ One substitute template for the spelling of the word colour/color
A variety of templates to suit what you are looking for. Some are plain (so your students can add their own patterns/designs) while others are already decorative and just need colouring.
Designed on A4 size paper.
**********************************************************************
© Suzanne Welch Teaching Resources
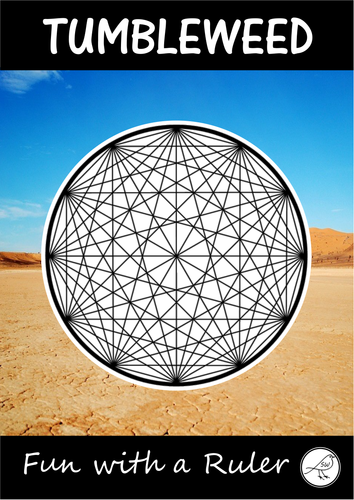
Math Art - Fun with a Ruler - Tumbleweed
A ‘Fun with a Ruler’ math/art project for your students. This project involves your students ruling straight lines between 2 dots on a template. When they have finished drawing all of the lines they can give their artwork some colour.
Included:
♦ Template
♦ Example
♦ Instructions
♦ Teacher notes
Level of Difficulty:
Your students need to be able to use a ruler to draw straight lines between 2 points. The design can look more complicated than it actually is. Concentration is required, but the actual process is not difficult.
Instructions:
Simple, clear, easy-to-follow instructions are provided. One instruction per page (image and a sentence). Display the instructions via a data projector if you have access to one. Otherwise print and enlarge them and/or demonstrate on an enlarged template.
Equipment:
You need a ruler and a pen (black works best). Something to colour with (eg coloured pencils, watercolours, felt tip markers, chalk pastels, dye, etc)
Size:
The circle is approximately18cm in diameter. Designed on A4 size paper.
Keywords: string art, math, geometry, patterns, lines, ruler.
© Suzanne Welch Teaching Resources
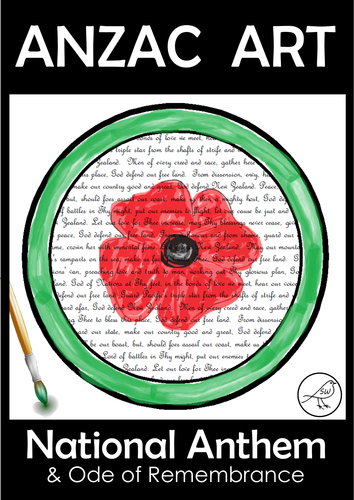
Anzac Art
Make some great ANZAC art with this set of paper. Create an Anzac image on top of the National Anthem or the Ode of Remembrance.
Included:
♦ New Zealand National Anthem - English
♦ New Zealand National Anthem – Te Reo Māori
♦ Australian National Anthem – English
♦ The Ode of Remembrance - English
3 Different Formats:
♦ Circle with frame
♦ Plain white paper
♦ Parchment paper
Each set of paper is provided in 4 different fonts to give you and your students plenty of choice.
Coloured pencils or watercolour paints are recommended as they will allow the text to still show through.
Multi-use:
A great thing about this set of paper is that it can be used within other studies … not just Anzac Day. For example, a unit on Kiwiana / national identity.
*******************************************************************
© Suzanne Welch Teaching Resources
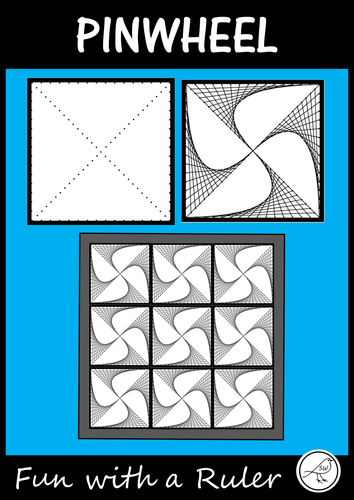
Math Art – Parabolic Curves - Pinwheel
A ‘Fun with a Ruler’ math/art project that uses parabolic curves to make an interesting ‘pinwheel’ design.
This project involves your students ruling straight lines between 2 dots on a template. When they have finished drawing all of the lines they can give their artwork some colour.
Included:
♦ Template (black or grey dots)
♦ Example
♦ Instructions
♦ Teacher Notes
There are 2 different templates to choose from. One of them is more suitable for older students as more care needs to be taken in ‘congested’ areas of the design. The designs are the same (one just has more dots/lines).
Level of Difficulty:
Your students need to be able to use a ruler to draw straight lines between 2 points (the curves are made with straight lines … it’s like magic!). The designs can look more complicated than they actually are. Concentration is required, but the actual process is not difficult.
Instructions:
Simple, clear, easy-to-follow instructions are provided. One instruction per page (image and a sentence). Display the instructions via a data projector if you have access to one. Otherwise print and enlarge them and/or demonstrate on an enlarged template.
Equipment:
You need a ruler and a pen (black works best). Something to colour with (eg coloured pencils, watercolours, felt tip markers, chalk pastels, dye, etc)
Size:
The design is 17.5cm x 17.5cm. Designed on A4 size paper.
Keywords: string art, math, geometry, patterns, parabolic curves
© Suzanne Welch Teaching Resources
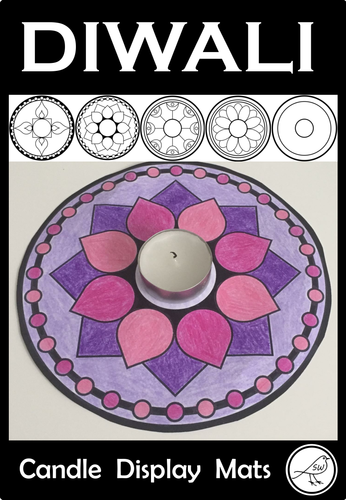
Diwali – Candle Display Mats
A fun, effective art activity for your students when celebrating Diwali (The Festival of Lights).
Colour, cut and place a tealight candle in the centre. Laminate if desired.
Included:
♦ 4 x templates with a design
♦ 1 x blank template (students design their own pattern)
Size:
Approximately 16.5cm in diameter.
Provided in 2 paper sizes:
♦ A4 paper
♦ Letter paper
**********************************************************************
© Suzanne Welch Teaching Resources
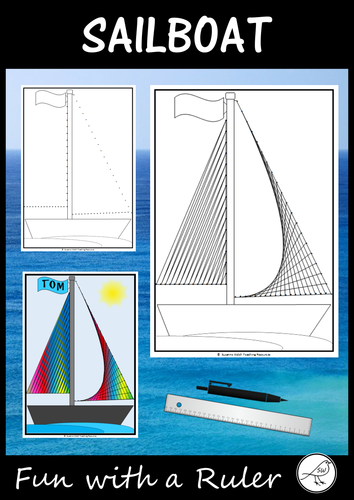
Math Art - Fun with a Ruler - Sailboat
A ‘Fun with a Ruler’ math/art project for your students. This project involves your students ruling straight lines between 2 dots on a template. One set of lines makes a parabolic curve and the other set makes a zig-zag pattern. When they have finished drawing all of the lines they can give their artwork some colour.
Included:
♦ Template
♦ Example – black/white
♦ Example - coloured
♦ Instructions
♦ Teacher notes
Level of Difficulty:
Your students need to be able to use a ruler to draw straight lines between 2 points (the curves are made with straight lines … it’s like magic!). The designs can look more complicated than they actually are. Concentration is required, but the actual process is not difficult.
Instructions:
Simple, clear, easy-to-follow instructions are provided. One instruction per page (image and a sentence). Display the instructions via a data projector if you have access to one. Otherwise print and enlarge them and/or demonstrate on an enlarged template.
Equipment:
You need a ruler and a pen (black works best). Something to colour with (eg coloured pencils, watercolours, felt tip markers, chalk pastels, dye, etc)
Designed on A4 size paper.
Keywords: string art, math, geometry, patterns, parabolic curves, water, ocean, wind, sport
© Suzanne Welch Teaching Resources
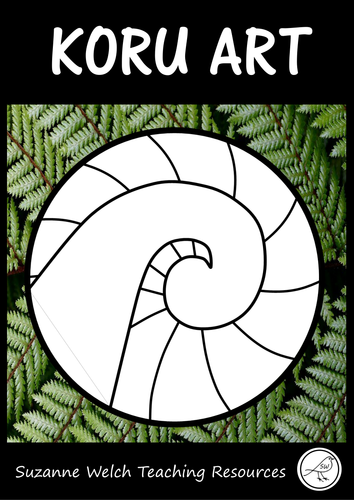
Koru Art – 4 Different Templates
The koru is a popular symbol in New Zealand. Here is a set of 4 different templates that can be used in a variety of ways …. you decide!
The 4 Templates:
♦ Plain (koru only)
♦ Radiating lines behind koru
♦ Patchwork lines behind koru
♦ Radiating lines with patterns behind koru
Ideas:
♦ Draw patterns in the background spaces.
♦ Write words in the background spaces (eg ‘all about me’).
♦ Colour using warm/cool colours.
♦ Colour using blending/shading.
**********************************************************************
© Suzanne Welch Teaching Resources
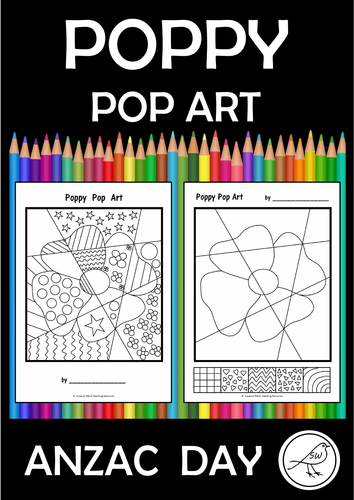
Anzac Day – Poppy Pop Art
A fun, effective art activity for your students when celebrating Anzac Day.
Draw some patterns on the poppy / background and colour it in.
4 different templates are included:
♦ TEMPLATE 1 and 2 – the patterns are given in the boxes at the base of the sheet. Students transfer these patterns to the poppy and the background and then colour everything in.
♦ TEMPLATE 3 – this is a blank template. Your students decide on their own 5 patterns and draw them in the boxes at the bottom of the sheet.
♦ TEMPLATE 4 – the patterns are already given on the poppy and the background. This is just a colouring activity.
**********************************************************************
© Suzanne Welch Teaching Resources
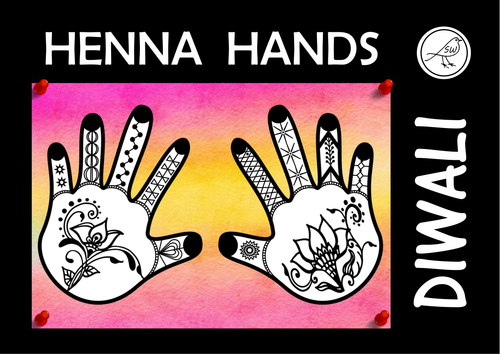
Diwali - ‘Henna Hands’ art activity
A fun and creative art activity to celebrate Diwali (Deepavali), the Hindu Festival of Lights.
ACTIVITY 1
Draw patterns on the hand templates using a black pen/marker/ink (there are lots of images on the internet to get inspiration). Cut out and display on a coloured background.
ACTIVITY 2
Draw patterns in the hands of the boy/girl. Colour the rest of the picture. Three different templates provided (boy, girl, unisex).
ACTIVITY 3
Draw patterns in the hand template and write an acrostic poem. Write your name or a fact about Diwali in the box under the handprint.
INCLUDED:
♦ Teacher notes.
♦ Handprints – template.
♦ Handprints – template with border.
♦ Handprints – with coloured background (x2).
♦ Example – designs on hands with a coloured background.
♦ Example - designs on hands with a plain white background.
♦ Handprints – boy/girl/unisex.
♦ Single handprint with acrostic poem template.
♦ Single handprint (2 per page).
*********************************************************************
© Suzanne Welch Teaching Resources
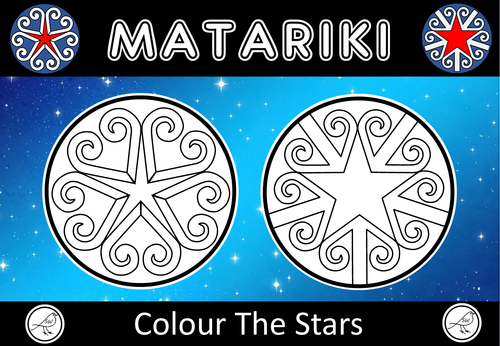
Matariki – Colour the Stars
Celebrate the Maori New Year with this art activity – colour the koru stars.
Two different templates.
A fun colouring activity for New Zealand students during Matariki.
Designed on A4 size paper.
© Suzanne Welch Teaching Resources
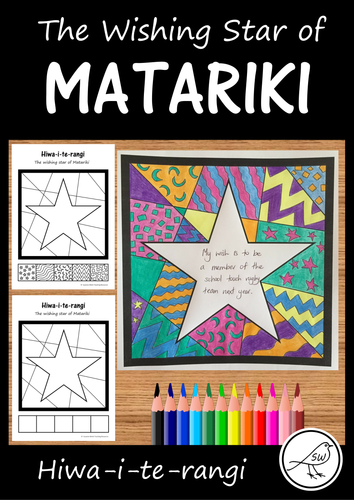
MATARIKI - Wishing Star
A creative classroom activity for celebrating Matariki (the Māori New Year).
Hiwa-i-te-rangi is one of the 9 stars in the Matariki star cluster. It is known as the ‘wishing star’. This star has a connection to our hopes, dreams and aspirations for the year ahead.
The Process:
1. Draw patterns in the spaces around the star shape (use a black ball-point pen).
2. Colour.
3. Write a wish in the star.
4. Cut out around the outside black frame.
5. Display on the wall (you may like to do this so it looks like a patchwork quilt).
Three different templates are provided for you to select from. Two templates have pre-drawn patterns in the boxes at the bottom, and one is blank so your students can design their own patterns.
Included:
♦ Instructions
♦ Information card about Hiwa-i-te-rangi
♦ Template A – with patterns
♦ Template B – with patterns
♦ Template C - blank (draw your own patterns)
Made on A4 size paper.
Finished size of artwork (after cutting it out) is approx 18cm x 18cm.
**********************************************************************
© Suzanne Welch Teaching Resources
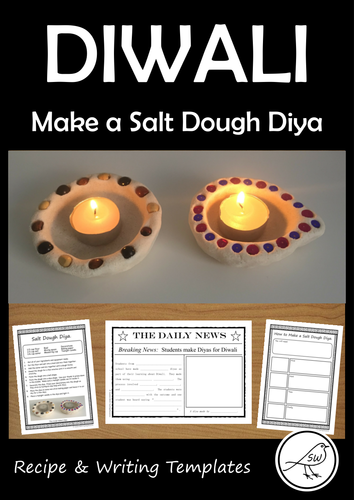
Diwali – Make a Salt Dough Diya
A fun, easy craft activity for celebrating Diwali (The Festival of Lights).
Follow the instructions to make a diya out of salt dough and leave it to air dry for a few days. Decorate before drying (like the images provided), or dry and then paint/decorate.
MAKING THE DIYA:
Resources to assist with making the diya include:
♦ Teacher notes (with lots of ideas and hints).
♦ Recipe for your students to follow (makes 1 diya).
♦ Sequencing Cards – use as a recipe or as a sequencing task before making. These include pictures and text.
WRITING TASKS:
Two writing tasks are included as a follow-up to the craft activity.
♦ procedural / instructional writing (3 different templates).
♦ newspaper report writing (2 different templates plus an example).
One of the newspaper reports is a fill-in-the-blanks template which is suitable for junior students.
The instructions state to air dry the diya (takes a few days) but you could choose to dry it in the oven to speed up the process (details included in the teacher notes).
WHAT YOU NEED:
Flour, salt and water. Things to decorate it with (buttons, beads, shells, glitter, paint, etc).
If you have junior students, this is a great activity for you to do with a buddy class who are a bit older.
**********************************************************************
© Suzanne Welch Teaching Resources

Mother’s Day Flower Art Activity
A fun, effective art activity for your students to complete and give to their mother on Mother’s Day.
It looks tricky …. but it is very simple! The artwork involves drawing a number of straight lines between the dots on a template. Your students will get a thrill when the curves just appear!
Included:
♦ dotty template.
♦ template with lines (this can be used to show the completed design, or for a ‘colouring only’ activity).
♦ example of finished, coloured artwork.
♦ simple, clear instructions (with images).
I have provided 8 steps to complete the line art. Each step is on one page. The instructions are suitable for displaying via a data projector so all of your students can refer to it and self-check.
The Process:
♦ Draw the lines.
♦ Draw a stem, leaves, flower pot, etc.
♦ Write words/phrases in the petals that describe your Mother.
♦ Colour/decorate.
♦ Give to your Mother.
This activity is also suitable as a general art activity. You don’t have to use it for Mother’s Day.
Have a student that doesn’t celebrate Mother’s Day? No problem. They can make the flower and decorate it in a different way.
Skill enhancement: ruling straight lines with precision.
Keywords: parabolic curves, string art, line art, geometry, flower, math, ruler, straight lines.
© Suzanne Welch Teaching Resources
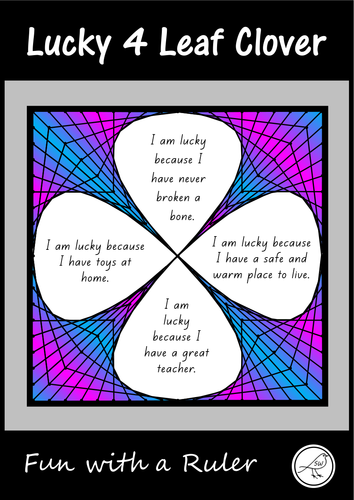
Lucky 4 Leaf Clover – Fun with a Ruler
This art activity can be used for any theme, not just as a ‘lucky four leaf clover’.
The activity involves your students ruling straight lines between 2 dots on a template. When they have finished drawing all of the lines they can give their artwork some colour. The example shows writing in each leaf, but you can change this if you wish.
Included:
♦ Template – black dots
♦ Template – light grey dots
♦ Example
♦ Instructions
♦ Teacher notes
♦ Coloured example
Level of Difficulty:
Your students need to be able to use a ruler to draw straight lines between 2 points (the curves are made with straight lines … it’s like magic!). The designs can look more complicated than they actually are. Concentration is required, but the actual process is not difficult.
Instructions:
Simple, clear, easy-to-follow instructions are provided. One instruction per page (image and a sentence). Display the instructions via a data projector if you have access to one. Otherwise print and enlarge them and/or demonstrate on an enlarged template.
Practise Tempate:
A practise template is included for your students to practise ruling the pattern before you give them the actual template.
Equipment:
You need a ruler and a pen (black works best). Something to colour with (eg coloured pencils, watercolours, felt tip markers, chalk pastels, dye, etc)
Size:
The square is approximately 17cm x 17cm. Designed on A4 size paper.
Keywords: St Patrick's Day, Ireland, Irish, string art, math, geometry, patterns, parabolic curves.
© Suzanne Welch Teaching Resources

Colour Mixing
Colour Mixing – flashcards, activity sheets, game and reference chart
UK and USA spelling included (colour/color grey/gray)
Flash Cards - 3 different types:
♦ colour splodges and word equations
♦ colour splodge equations – work out the final colour
♦ colour splodge equations – work out the missing colour
Activity Sheets - 3 different types:
♦ colour the last splodge of the equation (print in colour)
♦ colour the splodges and work out the last splodge of the equation
♦ colour the splodges and work out the missing splodge
Game:
‘Four-in-a-row’ game - instructions and gameboard.
All you need is a dice and some counters.
1. Player A rolls the dice.
2. Player A reads the colour mixing equation that is located under the picture of the dice on the left side of the board.
3. Player A finds the answer to the colour mixing equation on the gameboard and covers one of those squares with one of their counters.
4. Player B has their turn.
5. Players continue to take turns. The winner is the first player to get 4 of their counters in a row.
The 6 colour mixing equations:
red + white = pink
blue + yellow = green
red + blue = purple
white + black = grey
green + red = brown
yellow + red = orange
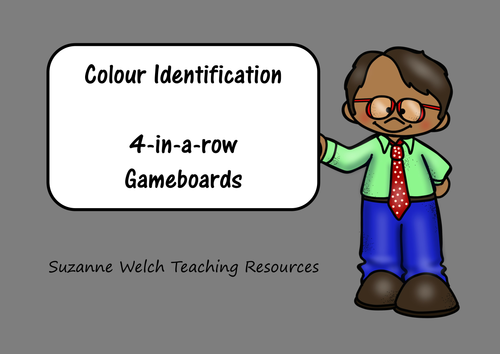
Colour Identification - 4 in a row gameboard
Practise your colour identification with these 3 gameboards.
UK and USA spelling included (colour/color grey/gray)
The Game: 4-in-a-row:
♦ Instructions and gameboards included.
♦ All you need is a dice and some counters.
♦ Suitable for 2 players.
How to play:
1. Player A rolls the dice.
2. Player A reads the colour word that is located under the picture of the dice on the left side of the board.
3. Player A finds that colour on the gameboard and covers one of those squares with one of their counters.
4. Player B has their turn.
5. Players continue to take turns. The winner is the first player to get 4 of their counters in a row.
Gameboard 1:
red, yellow, blue, green, black, orange
Gameboard 2:
white, pink, brown, purple, grey, cream
Gameboard 3:
light blue, dark blue, light green, dark green, light brown, dark brown

Poppy Art – Remembrance Day, Memorial Day, Armistice Day, Anzac Day.
A ‘Fun with a Ruler’ art project for your students to complete leading up to Remembrance Day / Memorial Day / Armistice Day / Anzac Day.
This project involves your students ruling straight lines between 2 dots on a template, to create a poppy. Your students could write something in the petals before colouring (eg facts, opinons, a 4 line poem, etc). Display them together to make a 'poppy patchwork quilt'.
Included:
♦ Template – black dots
♦ Template – light grey dots
♦ Example – black/white
♦ Instructions
♦ Teacher notes
Level of Difficulty:
Your students need to be able to use a ruler to draw straight lines between 2 points (the curves are made with straight lines … it’s like magic!). The design looks more complicated than it actually is. Concentration is required, but the actual process is not difficult. A pattern is repeated 8 times.
Instructions:
Simple, clear, easy-to-follow instructions are provided. One instruction per page (image and a sentence). Display the instructions via a data projector if you have access to one. Otherwise print and enlarge them and/or demonstrate on an enlarged template.
Equipment:
You need a ruler and a pen (black works best). Something to colour with (eg coloured pencils, watercolours, felt tip markers, chalk pastels, dye, etc)
Size:
The artwork measures approximately 17cm x 17cm. Designed on A4 size paper.
Keywords: string art, parabolic curves, math, geometry, patterns, war, symbolism, veteran,
© Suzanne Welch Teaching Resources

Poppy Art – ANZAC Day, Remembrance Day, Memorial Day, Armistice Day, etc (Design A)
A super-fun art project for your students when celebrating special days such as:
♦ ANZAC Day
♦ Remembrance Day
♦ Memorial Day
♦ Armistice Day
This project involves your students ruling straight lines between 2 dots on a template, to create poppy inspired art work. This is Design A (wreath).
Included:
♦ Template
♦ Example – black/white and colour
♦ Instructions
Level of Difficulty:
Your students need to be able to use a ruler to draw straight lines between 2 points (even the curves are made with straight lines … it’s like magic!). The designs look more complicated than they actually are. Concentration is required, but the actual process is not difficult.
Instructions:
Simple, clear, easy-to-follow instructions are provided. One instruction per page (image and a sentence). Display the instructions via a data projector if you have access to one. Otherwise print and enlarge them and/or demonstrate on an enlarged template.
Equipment Needed:
You need a ruler and a pen (black works best). Something to colour with (eg coloured pencils, watercolours, felt tip markers, chalk pastels, dye, etc)
Size:
The artwork measures approximately 17cm x 17cm. Designed on A4 size paper.
These designs are also available (in my store):
* Design B - cross
* Design C - medal
* Design D - poppy
Keywords: string art, parabolic curves, math, geometry, patterns, war, symbolism, veteran
© Suzanne Welch Teaching Resources
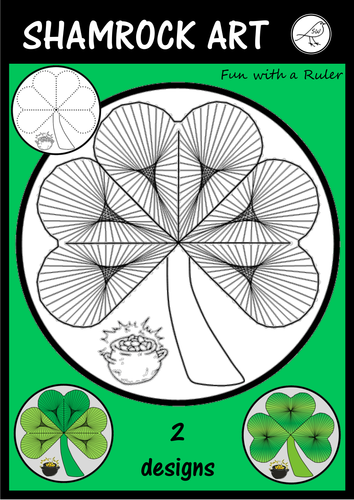
St Patrick's Day Art - Shamrock
A ‘Fun with a Ruler’ art project for your students to complete on St Patrick’s Day. There are 2 different templates to choose from.
This project involves your students ruling straight lines between 2 dots on a template. When they have finished drawing all of the lines they can give their artwork some colour.
There is space at the bottom of each template for a writing task that you may wish to set (eg ‘If I found a pot of gold I would …’). If you don’t want this, simply cut the artwork out when finished.
Included:
♦ Shamrock with pot of gold.
♦ Shamrock without pot of gold.
♦ Shamrock – draw your own stem, without pot of gold.
♦ Practise template.
♦ Example of the completed design.
♦ Instructions.
The templates are provided in both black and light grey dots.
Level of Difficulty:
Your students need to be able to use a ruler to draw straight lines between 2 points. The designs can look more complicated than they actually are. Concentration is required, but the actual process is not difficult.
Instructions:
Simple, clear, easy-to-follow instructions are provided. One instruction per page (image and a sentence). Display the instructions via a data projector if you have access to one. Otherwise print and enlarge them and/or demonstrate on an enlarged template.
Practise Tempate:
A practise template is included for your students to practise ruling the pattern before you give them the actual template.
Equipment:
You need a ruler and a pen (black or green works best for this project). Something to colour with (eg coloured pencils, watercolours, felt tip markers, chalk pastels, dye, etc)
Keywords: string art, math, geometry, patterns, Ireland, Irish, luck.
© Suzanne Welch Teaching Resources